Featured Posts Coolbthemes

January 07, 2012

Create Mule Project using Mule Studio

Hello All,
             Here, i described the Simple Mule Project Creation with Mule Studio and i also thankful to Azaz  who help me in this task.


Step1: Start Mule Studio and create a workspace directory

Click on the "New Mule Project" from the Welcome pageOr click on File -> New -> Mule Project from the Mule Studio menus.


Step 2:Enter the project name "Hello Mule" and click Next ,Create flow "hello" then click Next and Finished.


Step3: After that you will get Mule flow GUI screen as follow.


Now we are ready to start using Mule Studio.


No
Description
1.
Package Explorer Tree.
2.
src/main/resources where the flow/s is/are stored.
3.
scr/Main/app contains the flow xml files.
4.
Palette where Endpoints, components, transformers, filters, routers, scopes and cloud connectors are displayed in order to create the flow in the canvas.
5.
Canvas. Depending on 7, 8 and 9, different editor sections will be shown.
6.
Outline view.
7.
Message flow graphic editor.
8.
Global Elements view.
9.
Configuration XML editor.
10.
Problems section where errors are displayed.

Step4: Create package under src/main/java and then create a class "HelloWorld", we can create a method "sayHi()" in HelloWorld


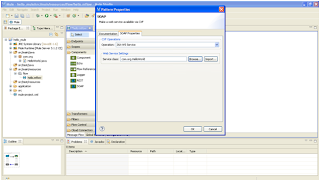
Step5: Drag the HTTP endpoint and double click the HTTP endpoint,and change the host, port and path value.


Step 6: Now drag the SOAP Web Service the component ,double click the SOAP component,click the browse button and select a class which u created before and click OK.


Step 7: after that u can drag the component from components drop down,double click the component and select the class using browse and click OK.


Step 8: Now run hellow .mflowfile , right click the hello .mflow file Go to Run-> click the Mule application.


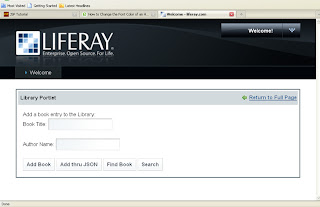
Step 9: Go to http:localhost:8081 and enter and you should see the following results in your browser.


Reade more >>

August 27, 2011

How To Configure Different Themes For Alfresco Share Sites - Part 1

I have been created the "sites per theme".
For example,training related site would use one theme (e.g. blue inspired) and a knowledge base site would use another theme (e.g. green inspired).

Out of the box functionality that we can use for this :

  • For out-of-the-box with Alfresco doesn't supports the Configuring themes per site.
  • The only thing is that is useful to append the theme parameter with all URLs.
  • The page would be displayed with that theme.
    • For example, The id test will be displayed with the treasure theme(So if we could just intercept the incoming requests to /page/site/* we could append the theme parameter and define the themes that we want to use for the different sites in the normal way.)

http://[hostname]:[port number]/share/page/site/test/documentlibrary?theme=gdocs

  • This can be done with a Servlet Filter.

Implementing a Servlet Filter to append the theme parameter :

A Servlet Filter can be used to append a HTTP Request parameter by wrapping the request before it is sent for processing. We would first configure the filter with the site IDs and the themes that should be used for these site IDs:

<filter> ... 	<init-param> 		<param-name>sites</param-name> 		<param-value>helloworld,test</param-value> 	</init-param> 	<init-param> 		<param-name>themes</param-name> 		<param-value>default,gdocs</param-value> 	</init-param> </filter>

The sites filter parameter contains the identifiers for the sites that we want to set themes for and the themes filter parameter contains the theme identifiers. In this case the site with the id helloworld will use the default theme and the test site will use the Google Docs theme (gdocs).

We can then use these parameters in the implementation of the filter:

package com.ixxus.cms.util;  import java.io.IOException; import java.util.Map; import java.util.HashMap; import java.util.StringTokenizer;  import javax.servlet.Filter; import javax.servlet.FilterChain; import javax.servlet.FilterConfig; import javax.servlet.ServletException; import javax.servlet.ServletRequest; import javax.servlet.ServletResponse; import javax.servlet.http.HttpServletRequest; import javax.servlet.http.HttpServletRequestWrapper;  public final class ThemeAppenderFilter implements Filter { 	private static final String SITE_NAMES_FILTER_PARAMETER_NAME = "sites"; 	private static final String SITE_THEMES_FILTER_PARAMETER_NAME = "themes"; 	private static final String THEME_URL_PARAMETER_NAME = "theme"; 	static Map m_site2themeMap;  	static class ModifiedRequest extends HttpServletRequestWrapper { 		public ModifiedRequest(ServletRequest request) { 			super((HttpServletRequest)request); 		}  		@Override 		public String getParameter(String paramName) { 			String value = super.getParameter(paramName); 			if (THEME_URL_PARAMETER_NAME.equals(paramName)) { 				value = m_site2themeMap.get(getSiteId(getRequestURI())); 			} 			return value; 		}  		private String getSiteId(String url) { 			String siteId = null; 			String temp = url.substring(url.indexOf("/site/") + 6); 			siteId = temp.substring(0, temp.indexOf("/")); 			return siteId; 		} 	}  	public void init(FilterConfig filterConfig) 	throws ServletException { 		m_site2themeMap = new HashMap(); 		String sites = filterConfig.getInitParameter(SITE_NAMES_FILTER_PARAMETER_NAME); 		String themes = filterConfig.getInitParameter(SITE_THEMES_FILTER_PARAMETER_NAME); 		StringTokenizer st = new StringTokenizer(sites, ","); 		StringTokenizer st2 = new StringTokenizer(themes, ","); 		while (st.hasMoreTokens()) { 			if (st2.hasMoreTokens()) { 				m_site2themeMap.put(st.nextToken(), st2.nextToken()); 			} 			else { 				System.out.println("The '" + SITE_THEMES_FILTER_PARAMETER_NAME + 				"' filter parameter has not been specified correctly, it is missing theme specs for one or more sites"); 			} 		} 	}  	public void destroy() {}  	public void doFilter(ServletRequest request, ServletResponse response, FilterChain chain) 	throws IOException, ServletException { 		HttpServletRequest httpRequest = (HttpServletRequest) request; 		chain.doFilter(new ModifiedRequest(httpRequest), response); 	} }

In the ThemeAppenderFilter class we define a nested class ModifiedRequest that wraps the incoming HTTP request, this inner class overrides the getParameter method that some Alfresco Share framework Servlet will call to see if the theme parameter is available. When this happens we intercept it and give it back the theme that has been configured for the site. When the filter is initialized we setup a Map with siteId -> themeId mappings.

This class can be built against the standard Alfresco SDK and then put in a JAR file that is copied into the alfresco/tomcat/webapps/share/WEB-INF/lib folder.

Sites that are not configured with a specific theme will use the currently configured theme for Alfresco Share.


End of Part 1 >>


Reade more >>

August 10, 2011

Liferay6 ExtPlugins


Reade more >>

June 27, 2011

Running Alfresco Web Scripts as Liferay Portlets

Running Alfresco web scripts as Liferay Portlets

I've seen a lot of Liferay and Alfresco forum posts from people having trouble getting Alfresco running within a Liferay portal.

Once that's done, people usually want to invoke Alfresco web scripts as portlets without requiring a separate single sign-on (SSO) infrastructure.

1. Download the Liferay Portal 5.x war.

2. Unpack the Liferay distribution and fire it up. Make sure you can log in as the test@liferay.com (password: test) user to validate that all is well with the Liferay install.

2a. Create a test user. ("Create Account" on the Liferay login screen). Remember the email address.

  • For this discussion I'll assume Sample User with a screen name of sample and an email address of sample@sample.com. Make sure you create a home directory.
  • In this example, we'll call it "sample".

2b. Verify that you can log in as your test user.

3. Shut down the server.

4. Download Alfresco 2.1.2 Enterprise , 3.2r2 CE WAR only.

Note: Alfresco 2.1.1 , 3.2 CE has a known issue (AWC-1686) with the way authentication is handled for web scripts in the context of Liferay so make sure you are using 2.1.2.

5. Expand the Alfresco WAR into the Tomcat webapps/alfresco directory (which you'll have to create the first time). If you are tweaking the install (such as pointing to a specific MySQL database, using something other than MySQL, pointing to a different data directory, etc.) make sure you have copied your good set of extensions into Tomcat's shared/classes/alfresco/extension directory.

6. Copy the MySQL connector into Tomcat's common/lib directory.

7. Start Tomcat. When it comes up, you'll have Liferay running and you'll have Alfresco running, but Liferay doesn't yet know about Alfresco. Verify that you can log in to Alfresco as admin.

7a. While you are here, create a test user account. You need to create a user account that has an email address that matches the test user account you created in Liferay. In this example you created Sample User with a screen name of fuser and an email address of sample@sample.com so you need to create an Alfresco user with the same settings. You'll log in to Alfresco as sample. You'll log in to Liferay as sample@sample.com.

7b. Verify that you can log in to Alfresco as sample.

8. Shut down Tomcat.

9. Now you need to configure Alfresco as a Liferay plug-in. This involves adding four files to Alfresco's WEB-INF directory: liferay-display.xml, liferay-plugin-package.xml, liferay-portlet.xml, and portlet.xml. Why aren't these available in the Alfresco source or on the wiki? Apparently someone tried to address this at some point because there is a link on the wiki but it is broken. Until that's addressed, I've put them (Email me)

10. Remove the portlet-api-lib.jar file from Alfresco's WEB-INF/lib directory.

11. Re-package alfresco.war. It is now ready to hand over to Liferay.

12. Start Tomcat.

13. Find your Liferay deploy directory. If you are running out-of-the-box on Linux, Liferay's "deploy" directory is called liferay/deploy and it resides in the home directory of the user who started Tomcat. I'm running it as root so my Liferay deploy directory is /root/liferay/deploy.

14. Copy the alfresco.war you just created into the deploy directory. Watch the log. You should see Liferay working on the WAR. He's finding the plug-in config files and essentially deploying the Alfresco portlets.

15. Now log in to Liferay using the Liferay admin account (test@liferay.com). Go to a page, then use the global navigation dropdown to select "Add Content". The list of portlets should appear and you should see the "Alfresco" category. If you don't, look at the log because something is amiss. Add the My Spaces portlet to the page. You may see an error at this point but ignore it. The problem is you probably don't have a user in Alfresco that has an email address of "test@liferay.com", which is the currently-logged in user.

16. Log out.

17. Log in as your test user that exists in both Alfresco and Liferay (sample@sample.com).

18. Go to the page. You should see the "My Spaces" portlet. You should be able to upload content, create spaces, etc.

Regards,
Tapan Avasthi

Reade more >>

Using Hibernate API

Using Hibernate API

===============================================================
Writing Dynamic Query using Hibernate API's


http://www.liferay.com/web/guest/community/wiki/-/wiki/Main/Queries+2%3A+DynamicQuery+API

http://www.liferay.com/web/guest/community/wiki/-/wiki/Main/How+to+create+a+custom+query+in+liferay

http://www.liferay.com/web/guest/community/wiki/-/wiki/Main/How+to+create+a+custom+query+in+ext+for+Liferay+models


Forming a Dynamic Query :
=========================
Step 1:

in AddBookAction.java:

if (Validator.isNull(cmd)) {
BookLocalServiceUtil.create(bookTitle);
}else{
List<Book> results = null;
if (cmd.equals(" find" )) {
results = BookLocalServiceUtil.findBooks(bookTitle);
}else {
DetachedCriteria dCriteria = DetachedCriteria.forClass(Book.class);
dCriteria.add(Restrictions.like(" title" , " %" + bookTitle + " %" ));
DynamicQuery dynamicQuery = new DynamicQueryImpl(dCriteria);
results = (List)BookLocalServiceUtil.dynamicQuery(dynamicQuery);
  }
req.setAttribute(" results" , results);
req.setAttribute(" cmd" , cmd);
}

Make following imports

import org.hibernate.criterion.DetachedCriteria;
import org.hibernate.criterion.Restrictions;

import com.liferay.portal.kernel.dao.orm.*;
import com.liferay.portal.dao.orm.hibernate.DynamicQueryImpl;


Step 2:
=======
in view.jsp

Add for 'search' button

<input type=" button" value=" Search" onClick=" <portlet:namespace />findBook('search');" />

Note: the findBook JS function is now accepting a parameter, do changes to this function and also to the " Find Book" button.

Step 3:
=======

In Success.jsp update this

if (Validator.isNotNull(cmd)) {
books = (List)request.getAttribute(" results" );
} else {
books = BookLocalServiceUtil.getAllBooks();
}

Step4 :
========
Verify we've done all the steps properly
  ant deploy from ext-impl,
  ant deploy-fast from ext-web,
  restart tomcat


Regards,
Tapan Avasthi
Reade more >>

JBPM Integration with Liferay 6 (Singular Work Flow)C8YE5VHCGW33

JBPM Integration with Liferay 6

To integrate JBPM with Liferay 6, only jbpm component is required. The workflow portlet is availabe with liferay 6.

Following are the steps involved :

1. Get the source for JBPM from Liferay SVN.

2. Perform ant build-samples from jbpm-web.

3. copy the .jar file created in /../liferay-plugins-sdk-6.0.5/webs/jbpm-web/samples, to
/../liferay-plugins-sdk-6.0.5/webs/jbpm-web/docroot/WEB-INF/lib.

4. Perform ant deploy in the jbpm-web. Now the war file will be created in the dist
folder of plugins sdk, and in the deploy folder of liferay-portal-6.

5. After performing the following steps start the liferay-tomcat server,and perform the
following.

1. Sign in as test@liferay.com password test.

2. Select the control tab from the manage menu available at the top.

3. Select the Workflow from the control panel,and add a definition.

4. In the add definition click on browse and select /.../liferay-portal-6.0.5/tomcat-6.0.26/
webapps/jbpm-web/WEB-INF/lib/Single Approver.jar.

5. Then select the Default Configuration tab and select the Single Approver from the
drop down for the web content resource.

6. Create a new organization with a name as Sample Organization.

7. Create a new role name Sample Creator and select define permission from the
action and add a new permision web content.

8. Create 2 user's sampleadmin and samplecreator.

9. Assign role administrator to sampleadmin and Sample Creator to samplecreator.

10. Sign in as samplecreator and go to the Sample Organization and then from the
control panel select the web contet and add a new web content,after adding the
content click on Submit For Publication as you will click you will find a pending
stauts for the webcontent which you have added.

11. Now sign in as a sampleadmin go to Sample Organization from the control
panel select My Workflow Tasks. You will see the web content you added as a
samplecreator in the Assigned To My Roles section in the pending tab.

12. Now click on action button and select Assign to Me. Now you will see that the
content is in Assigned to Me section ,Now click the action button, from here you can
approve or reject the webcontent.

13. Once you approve or reject the web content you will find the content in the
completed tab.

14. If you have approved the web content then u can see the web content in the asset
publisher portlet of the Sample Organization.

Regards,
Tapan Avasthi
Reade more >>

Liferay

Liferay

--
Tapan Avasthi

Reade more >>

About Me

Bhavnagar, Gujarat, India
Liferay/Alfresco Consultant Mail : avasthitapan@gmail.com Skype : tapan.avasthi